Monday, December 15, 2008

My awesome Fleur-de-lys fuzzy pants

So Jo-anns had a Black Friday sale that just couldn't be beat. Polar fleece was $2.99 a yard, even the patterned stuff, plus you got 20% off your entire purchase.

I originally went to get stuff for making christmas presents, but then I saw this fabric and did the math, realizing that I could have a pair of polar fleece pants for $3.60.

Hells YEAH.

I whipped these up using Simplicity pattern 3640. It took about 2 hours; or rather, it would have taken 2 hours if I'd worked at it straight, and the internet didn't keep distracting me. As it was, it took about 2 days to finish :-\

BUT... now I have awesome fuzzy pants.


The awesome fuzzy pants.


A close up of the fabric.

They are SOOOOOO comfy, I wish I had bought more polar fleece to make more pants. Especially since now it's in the 20s, and will certainly be even colder when I get back to school.

Sunday, December 7, 2008

More oatmeal breakfast bar goodness

My first batch of the oatmeal cookies is running dangerously low (already...) so I decided it was time for round two. This time, I attempted to recreate my very favoritest Cool Mint Chocolate ClifBars.

My recipe:
3 c. oats (NOT instant oatmeal)
1 c. flour (I used whole wheat)
3/4 c. applesauce
3/4 c. brown sugar
1 egg
1/3 c. milk
1/2 tsp. baking soda
1/2 tsp. vanilla extract
1 1/2 tsp. mint extract
3 tbsp unsweetened cocoa powder

Step 1. Mix together the applesauce and sugar.
Step 2. Add the rest of the liquid ingredients.
Step 3. Add all the solid ingredients. Adding the cocoa powder and flour before the oatmeal will make this easier to mix.
Step 4. Form 12 equal bars on a greased baking pan and bake for 10 minutes at 375 F.


The Results:
It definitely doesn't taste like ClifBars, but it doesn't taste bad, either. It was a little to minty (even for me, who loves mint with the great passion of a thousand suns) and not chocolaty enough. I would suggest cutting down to 1 tsp or even 1/2 tsp of mint extract, and either adding more cocoa powder, or adding some dark chocolate chunks. It also has a very different texture from Clifbars; because of the baking soda, they're much lighter and fluffier.

In terms of nutritional breakdown, it's slightly inferior, but somewhat comparable to a ClifBar.

Nutritional Data for ClifBar:
Serving size- 68g
Calories- 250
Fat- 5 g
Carbs- 43g
Protein- 10g

Nutritional data for my creation:
Serving Size- 60g
Calories- 260
Fat- 3.5g
Carbs- 49g
Protein- 9g

My next attempts will probably be more like a cookie, and I'll be trying out some spices suggested to me, like cloves and allspice. I also might take a jaunt down to Winco and see if they sell any protein powder in bulk, and experiment with mixing some of that in.

Pictures of all this will be forthcoming, when I figure out who in the house has the friggin' digital camera and steal it from.

Friday, December 5, 2008

Home Spa Recipes (and a few mishaps along the way...)

Another of my many hobbies is making bath and body products out of cheap stuff around my house. I went on a recent scouring of the internet, and found a lot of recipes relating to oatmeal (because I found a container of just expired oatmeal) and baking soda (because I found a huge honking Costco sized box of it).

One suggestion was to grind the oatmeal into a fine powder, then mix equal parts of oatmeal powder and baking soda with a little bit of water to make a paste, then smear this on your face as a masque.

After coming back from my daily walk on a particularly cold day, I decided it was spa day. I poured some bath salt into the tub, mixed up my oatmeal and baking soda, and sat in blissful luxury until I was thoroughly pruney. The face masque was fantastic, and left my skin feeling glorious.

But wait! There's more! We haven't gotten to the mishaps yet.
The next day, I'm washing my face, and oh! there's the rest of the oatmeal/baking soda mix. Thinking of making my own replacement for St. Ives scrub, I added a little bit of the mixture to my soap and started scrubbing away.

Suddenly I smelt a smell. A cloying, nasty smell I was very familiar with from both chem lab and cleaning: ammonia.

I frantically checked the back of my soap bottle to check the ingredients and sure enough, right after "water" on the ingredients list was "ammonium laurel sulfate".

Here's a little chemistry lesson for y'all. Soaps, and their cousins detergents, are a salt composed of a fatty acid with a proton removed and some anion. Baking soda (sodium bicarbonate) is also a salt. Sometimes, when salts come into contact with each other, they will switch cations and anions, a reaction known as ion exchange. That would leave sodium laurel sulfate and ammonium bicarbonate.

Now bicarbonates are notoriously unstable, and will often decompose into carbon dioxide. Sure enough, when I checked Wikipedia, ammonium bicarbonate decomposes at 36 C (about 97 F) into carbon dioxide, water, and ammonia.

For those of you who don't know anything about science and who skipped the last two paragraphs, what this boils down to is I HAD AMMONIA ON MY FACE. (For those of you who REALLY don't know anything about science, that's hella bad.) After frantically rinsing my face for about 10 minutes and doing the "ewwgetitoffgetitoffgetitoff" dance, I was fine, and none the worse for wear.

However, I would like to share my little hard-learned bit of wisdom with the rest of the world, so that nobody else has to suffer the same fate.

That's not to say that it's a bad idea all the time. Baking soda is a chemical pH neutralizer, as well as an excellent exfoliant. Just make sure that your soap is made with a sodium or potassium detergent. (Most are made with Sodium Laurel Sulfate or Sodium Laureth Sulfate. Since sodium can't very well do an ion exchange with itself, it's perfectly safe to put baking soda in with these substances.)

That said, here are a few of my favorite cheap-ass home spa recipes.

OATMEAL HONEY FACE SCRUB
1 c oats
1/4 c almonds or walnuts
1/4 c honey

Grind the oats and nuts together in a coffee blender. Microwave the honey so it is nice and runny, then add to the oat/nut mix and blend together. You may also need to add a little bit of water. Spread over a moist face, gently rubbing in small circles for several minutes. Rinse off with warm water.


BATH SALTS
3/4 c Epsom salt (magnesium sulfate)
1/4 c Rock salt (sodium chloride)
3-4 drops of your favorite essential oil or extract

Pour it all in the bathtub, let it dissolve, and sit there soaking for about half an hour. This is great for sore muscles or mild sprains or pulls.


SUGAR SCRUB
1 c sugar (can be granulated or brown)
1/3 c oil (lots of people use olive oil: that's too expensive for me, so I use canola)
handful of crushed herbs or tea
3-4 drops of essential oil or extract

Just scoop some of this stuff up and scrub it anywhere you need exfoliated. Safe for use pretty much anywhere except your nether regions. If you use it on your face, be careful there isn't too much moisture, because otherwise the sugar will dissolve and run into your eyes.
This allows for an amazing amount of customization. I have made lavender, spearmint, peppermint, rosemary and mint, brown sugar and spice, chamomile, lemon, ginger, and vanilla scrubs before. Dink around with it and see what you come up with.
P.S. This is my favorite way to get rid of that box of tea in the cupboard that's been sitting there for years that nobody drinks.

My return (marked with oatmeal cookies)

So, I kinda forgot about this whole blog thing.
Not that I have any delusions of grandeur about anyone ever reading it, anyways.

I was searching the intarwebs for a good, lowfat oatmeal cookie that I could eat for breakfast. Kind of like those 90 calorie Quaker breakfast cookies. I found one here that I was able to modify for my needs.

First thing I did was take out the raisins. I have never quite been sure why everyone thinks that raisins and oatmeal are best buds. They're not. Raisins are nobody's best bud because they are disgusting and squishy and generally ruin everything they're put in.

I also upped the vanilla and cinnamon considerably, cuz that's how I roll.

My new recipe:
3 c. oats (NOT instant oatmeal)
1 c. flour (I used whole wheat)
3/4 c. applesauce
3/4 c. brown sugar
1 egg
1/3 c. milk
1/2 tsp. baking soda
2-3 tsp. vanilla extract
2-3 tsp. cinnamon

1. Mix the applesauce and the brown sugar together until the sugar is completely dissolved.
2. Mix in the egg, milk, vanilla, and cinnamon.
3. Mix in the other dry ingredients. Let it sit for a little while while you preheat the oven to 375 F, grease the baking sheets, and clean up a little. This will let the moisture absorb into the oats.
4. If you want cookies, drop by the teaspoon onto the baking sheets. If you would rather have something more like a breakfast bar, drop about 2 tbsp of dough in a vaguely rectangular-ish form. Bake for 8-10 minutes. I would suggest you make it closer to the 10 than the 8. I took mine out at 8 minutes, paranoid that they would become brick hard once they cooled, but they weren't quite done.

And there you have it. The batch I made came out to about 30 cookies. I ran all the numbers, and here's the nutritional data per cookie:
Calories- 110
Fat-1.5
Carbohydrates-20.5
Protein-3.6

These things are friggin' FANTASTIC. I wish I'd found this recipe 3 months ago so I could have made a bunch up to eat when I had 1st period class every day. I was a little skeptical at first about replacing the oil/butter normally in oatmeal cookies with applesauce, but they turned out very tasty. I would even say you could probably cut out 1/4 c. of the sugar, because they are very sweet.

I will probably do a little dinking around with this recipe to replicate my favorite Clif-Bars. Next on the list is chocolate and peppermint. MMM-mmmm...

Friday, April 25, 2008

Starting a Garden in Your Dorm Part II

The key with potted plants is to start small and gradually get bigger. Planting seeds directly into one-gallon pots has worked out horribly for me. What I have found to work wonderfully is starting seeds in ice-cube trays. Head out to goodwill and buy a few old ice-cube trays, then fill them with soil and put a couple seeds into each compartment.

Once the plants grow too big for the ice cube tray, put them into something slightly bigger. If you cut a .5 liter water bottle in half, then re-pot each section from the ice-cube tray into the watter bottle bottom, it's usually exactly the right size progression. And, since most water bottles are clear, you can see when the roots reach the bottom, and it's time to re-pot.

Once the root ball fills the bottom of a water bottle, it's big enough to put into a one gallon pot.

With a few types of plants (green beans or tomatoes work the best) making an upside-down hanging planter can maximize your space. Here's how it works:

1. Take a piece of cotton around 3"x3" and cut a slit in it.

2. Take a plant from the ice cube tray and gently push it through the hole so that the plant is on one side of the fabric and the roots are on the other side. Whip stitch the slit in the fabric closed .

3. Carefully feed the roots into the neck of a plastic bottle and secure the fabric around the neck with rubber bands. You may want to put the rubber bands on the bottle first, then feed the plant through, then secure the fabric, because you're less likely to hurt the plant this way.

4. Flip the bottle upside down and carefully cut out the bottom.

5. Fill the bottle up most of the way with potting soil.

6. Poke holes near the top of the bottle and string some cord or embroidery floss through them.

7. Find a nice place in the window to hang your plant!

Note: If you're not a big fan of the recycled-chic look, you can decorate the plastic bottle before hand with sharpies, nail polish, fabric, or anything else you want.

Starting a Garden in Your Dorm

Most people who don't have a yard don't even think about the possibility of gardening. At most, I've seen college students with a potted plant or two. But if you utilize your space well, you can actually get a full garden going in your dorm. Right now, I have spearmint, peppermint, lavender, rosemary, basil, dill, oregano, chamomile, cilantro, beans, tomatoes, broccoli, cucumbers, lettuce, and spinach growing, and will soon have carrots as well. (No, I am not messing with you)

Of course, gardening out of pots in your dorm room is going to require some forethought. Here's some things to start thinking about before you plant your garden:

1: How much light can you get?

I happen to be pretty lucky in terms of how much natural light and window space I have. In my room, I have some short plants on the windowsill, and also plants on my desk, which is right next to it. I also have a common room with an enormous wall of windows, and I have planters all along that windowsill, as well as hanging baskets. Not having access to a common room can limit what you can grow, but you can still have a surprising amount growing in just one little window.

2. What will you do with them over break?

If you drive home for summer or winter break, this is no problem for you. But if you fly home, taking plants on the plane isn't very feasible. But do not despair: find a few friends who drive who can each take a plant or two home. If you absolutely can't, then only plant annuals, and plant in time to harvest your crop before you go home.

3. What will you put them in?

You can go to any store with a garden center and buy plastic gallon planters for less than a dollar each. But if you're a cheapskate like me, and a little bit creative and resourceful, you can get all your planters for free. Save water bottles, soda bottles, milk jugs, even Styrofoam take-out platters, anything that could hold dirt in.
Also, if your college has a ceramics studio, go to the ceramics professor at the end of a term and ask if they could hold on to stuff as they're cleaning out the studio. TONS of ceramics pieces are left in the studio by students who take a class and never return to take their work home, and if you're lucky you can find some really nice things for free. But please ask first. Don't just take stuff off shelves.

4. Where will you get soil?

Again, you can go to a garden center and get potting soil cheap. But there are other ways of getting soil. If you only have a few small plants, you can just wander around campus and get a cup of dirt from here and a cup of dirt from there until you have enough. You can start a vermicomposting bin in your dorm/suite, which will give you nice compost and reduce the amount of trash going to landfills. Or, if your school has a greenhouse or any place where plants are grown for experiments, ask if you can use their soil. I know Knox has a compost pile for the greenhouse, and lots of people on campus get soil for their potted plants there.

Next post I'll talk about the process of starting your garden.

Wednesday, April 23, 2008

Since I've been talking about organizing, I thought I should put up some pictures of how my own room is organized.

As soon as these thoughts entered my head, my camera promptly died.

So I finally got a hold of my boyfriend's camera and took some pictures.

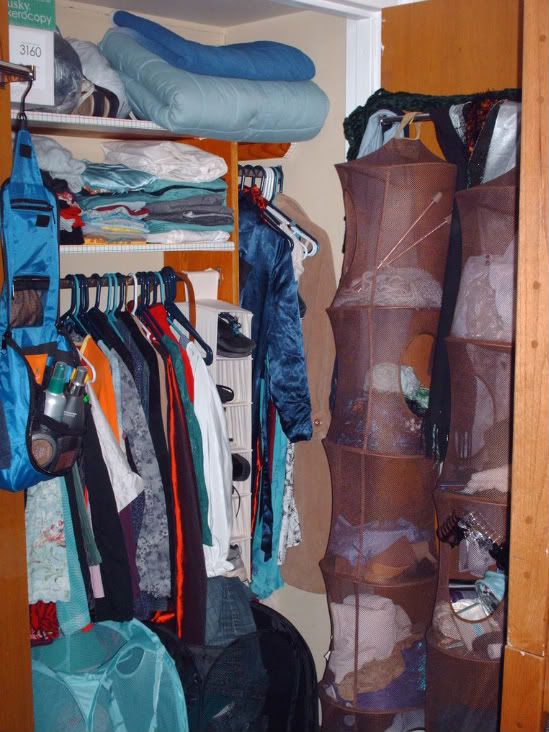
This is my closet:

My Closet


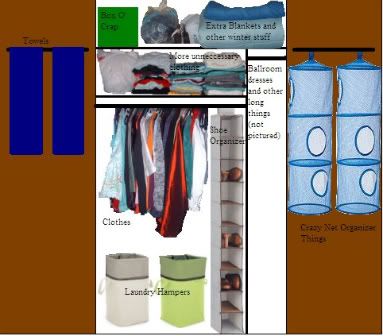
I can't get a very good picture since my bed is in the way, and to the untrained eye it pretty much looks like a blob of crap, so I used my mad paint skillz to make a schematic of how it's organized. (Yes, it is actually organized)

My closet layout

This is where most of my stuff lives. The remainder (my luggage, my fabric stash, and some winter stuff) lives under my bed.